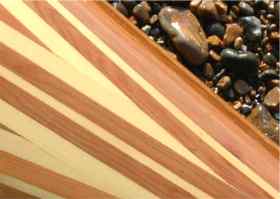
A cedar-strip sea kayak professionally built by Glyn Edwards Kayaks of Whitstable, England. There's another picture of it here. For Glyn's own illustrated build diary click here
Wood - building with strip plank and cold molding
![]()
Building in wood - strip plank Building in wood - cold molded Completing your wood kayak Protecting your wood kayak
Build Your Own Wood Kayak Building In Wood - Plywood Build Your Own Skin-On-Frame Kayak Kayak Outfitting
Go to top of Equipment chapter Go to next page Go to previous page
 |
A cedar-strip sea kayak professionally built by Glyn Edwards Kayaks of Whitstable, England. There's another picture of it here. For Glyn's own illustrated build diary click here
If you build in strip plank you can make either a hard-chine or round-bilge hull. In other words you can make a kayak with a truly rounded cross-section, if that's what you want. A strip plank kayak is likely to be beautiful and can be very tough if sheathed inside and out with fiberglass.
We've never tried strip-plank construction and the information in these paragraphs was kindly supplied by others. At the end, we suggest several places where you can get detailed information. We were surprised to hear how long it takes. It seems that even if you have good tools and a reasonable workshop space, a beginner may take 400 to 1500 hours to build the mold and one kayak.
As to professionals, Dan at Clear Stream Fine Woodworking reports that it took him 152 hours to build Björn Thomasson's round-bilge Njord design, and 116 hours to build Björn's Black Pearl design, which is hard chine so it goes together faster. That included fitting out, recessed deck fittings and so on. We expect you could triple that if the client wants color-contrasted strips, inlaid patterns, concave panel behind the cockpit, recessed cockpit coaming and recessed hatches.
However the results can be stunning. You'll find some photos of a Nick Schade design on www.oeko-travel.org (click on Selber machen, then on Projekte and Seakayak Guillemot)
Some very nice designs are available on both free and commercial websites. We'll start with free:
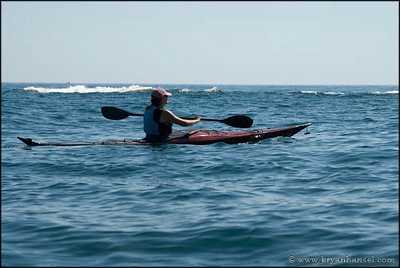
• www.Paddlinglight.com (used to be www.nessmuking.com). This is an impressive kayaking site. Bryan Hansel gives full data for home builders wanting a version of the 1959 Igdlorssuit kayak mentioned at Greenland Kayak. It is 16 ft 6 in by 20.5 inches, high rocker, low volume. Here's one afloat:
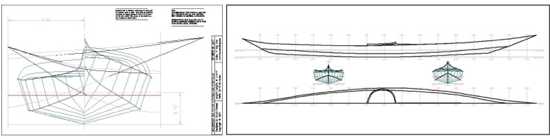
Here is a reduced image of the Igdlorssuit's lines:
A first-time builder may do well to buy a commercial design with full instructions:
• Thomasson Design. Björn Thomasson's very nice website with details of his many thoroughbred sea kayak designs.
• Guillemot Kayaks. This is the home of Nick Schade's nice kayak designs and the Kayak Forum with interesting comments by home-builders
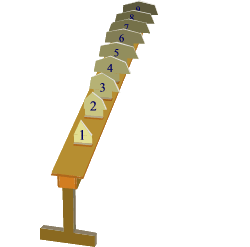
The first stage in strip-plank building is to make a kayak-shaped skeleton mold out of wood, on a straight, rigid base or strongback. One popular method is to obtain four planks about an inch thick and as long as the kayak. If three are 10 inches wide and one is 12 inches wide they can be assembled into a long straight box with overhanging edges at the top.
 If the humidity in your workshop changes frequently and warps long planks you could make the strongback from two sheets of 18 mm plywood.
Place the strongback on two or three trestles so that it is at a convenient height, take a sheet of one-inch particle board, fiberboard or cheap plywood and and cut out "stations" using the dimensions given in the plans.
In other words, make about 10 or 15 formers, each in the shape of a cross-section of the hull of the kayak.
Stand each former on end on the strongback and screw it into place at a measured distance from the neighboring former. When they are all in place, you have your skeleton mold and you are ready to start making the kayak hull.
Many varieties of wood make good strip planks. Western Red Cedar is often said to be perfect because it is compatible with epoxy resin, durable and very light. The disadvantage of its low density (only 350 kg/m3) is that it dents quite easily. See Wood in the section on making Greenland paddles. Other varieties of wood can be used for a color contrast.
The dimensions of the strips depend on the wood you are using, and the extent to which the shape of the kayak requires you to twist them. Typical dimensions are 5 mm thick, 20 mm wide and ideally as long as the kayak.
Usually, each strip has a concave groove cut along one edge and a matching convexity of the other edge so that each plank keys into the plank alongside it. Some lumber dealers specialize in boatbuilders' supplies, have a spindle molder (an industrial router permanently attached underneath a workbench), powered feed rollers for accuracy, and cutter heads of just the right radius. For suppliers of ready-cut cedar strips, see Retail Outlets.
You could cut your own strips with a circular saw mounted on a workbench. If you prefer the angular shape of the traditional Greenland kayak you may be able to use those strips just as they are, with plain square edges. If you are building a rounded hull, you could mill the strips at home using a domestic router attached to a workbench, and a pair of flute-and-bead router bits from a specialist tool supplier. Again, see Retail Outlets. If you intend to finish the kayak with clear sheathing and clear varnish rather than paint, the edges must be cut accurately or thick, wavy glue lines will be visible between each plank.
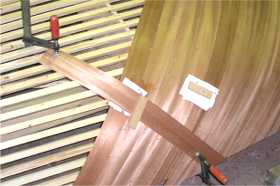
 Check your planks to make sure they are a good color match, and fit your first plank to the mold. Put on rubber gloves and a respirator and prepare some epoxy or polyurethane adhesive. Cover one edge of the first plank in adhesive and fit the next plank to it. Hold it in place with staples and/or many little clamps, and fit the next.
Place your first strips along what will be the top edge of the hull (the gunwale), so they go right from one end of the kayak to the other in a gentle curve.
As your planking progresses down the side and then towards the middle of the kayak, things start to get interesting. So that the planks run in an attractive curve at the ends, you may feel it necessary to cut, shape and fit shorter "stealer planks".
As you get towards the keel, you will find that you are fitting strips into a smaller and smaller oval hole, so you have to cut each end of each strip precisely to fit.
When the strips are all in place and the resin has set, you can remove the staples. Put your respirator and gloves back on and sand down the hull to remove all the excess epoxy from the surface, inside and out. Use some more resin to fill the inevitable little gaps. Then sand the hull smooth. Then raise the grain of the wood and smooth it again.
The deck is built the same way but on a different skeleton mold.
Now tackle the cockpit coaming, seat, bulkheads, hatches and trim. See Completing Your Wood Kayak.
See below as to protecting your wood kayak and epoxy encapsulation to prevent rot.
Sheathing is an optional extra for plywood or cold-molded kayaks, but a strip plank kayak is not much more than a bundle of wood strips until it has been sheathed on the outside at least, and many are sheathed with fiberglass inside and out. Having sealed the surface with a coat of epoxy resin, drape a layer of 160 g/m2 close-weave glassfiber cloth over it and apply epoxy resin until it is all wetted out. Make sure there are no bubbles between the cloth and the kayak and leave it to set. A slightly rough finish is acceptable inside the kayak.
Consider applying a second layer of sheathing to the underside of the hull. Apply another coat of epoxy resin to fill the weave of the cloth on the outside of the kayak, and sand that down. Then coat the whole thing with paint or varnish to protect the epoxy from UV light. Some builders report that it took them as long to sheathe the hull as it took to build it.
For more information see all of the following:
• The Building Manual at Björn Thomasson's site www.thomassondesign.com
• The Stripper's Guide to Canoe-Building, David Hazen, Tamal Vista Publications, 1976 but now in sixth edition. Includes the lines for a nice-looking 20 ft double kayak.
• KayakCraft, Ted Moores, 1999, WoodenBoat Publications. A sequel to his famous and excellent CanoeCraft. Very strong on technique. The featured kayak designs would not suit our style of kayaking.
• The Strip-Built Sea Kayak, Nick Schade, 1998, International Marine.
• The Kayak Forum. www.kayakforum.com
It is possible to lay up two or three layers of wood veneer on a wooden mold, and bond them together with glue so that you create a sheet of plywood in the precise shape of the desired object.
It's a lot of work, but it makes an exceptionally light, tough boat hull or aircraft fuselage. It was used by de Havilland during the 1939-45 war to build the Mosquito fighter-bomber. Until the arrival of fiberglass, Fairey Marine used hot molding to build a lot of superb wooden powerboats, yachts and sailing dinghies. The glues available at the time required the entire boat to be baked in a large oven or autoclave.
Today's epoxy resins will fill small gaps, they set slowly and they set at room temperature. Hence cold molding.
 The builder first makes a kayak-shaped wooden mold. A skeleton mold is enough for strip plank construction but cold molding requires a mold with a surface which is almost solid wood.
The builder then covers it with several layers of very thin wood veneer, held down with staples until the glue sets. Usually epoxy resin is used to glue the layers together. For a small sailing boat, three layers of veneer are needed. For a kayak, two layers may be enough. The builder will ensure that the grain of the first layer runs at 90 degrees to the grain of the second layer. The grain in the outside layer usually runs fore-and-aft, giving the impression that the boat was carved out of solid wood.
A separate mold is needed for the deck. With a sea kayak, it is often easier to make the deck from strip plank.
Although cold molding produces a better kayak than any other method of building in wood, it is not really suitable for building a single boat. Making the mold is a lot of work, and it is best to vacuum-bag the boat while the glue is setting. This puts every part of the laminate under high pressure, squeezing out any bubbles and surplus glue. When you have made a mold, vacuum system and one boat, you can make another twenty boats quite fast.
One kayak manufacturer uses the technique today. Struer Kajak of Denmark has an awesome reputation for Olympic sprint and marathon kayaks, many designed by the late, great Jørgen Samson, and they prefer to build them in wood veneer. Struer also make fiberglass and carbon fiber sea kayaks for touring and racing. The wooden boats are still hand-built by master craftsmen.
They use veneer from mahogany-type trees grown in Africa and South America, held together with five kinds of glue. When assembled, the kayak is put in a mold under 7 bar of vacuum and taken to a high temperature in an autoclave. It is then scraped and sanded smooth before being coated with epoxy resin, clear polyurethane and lacquer. It takes about 5 hours for a semi-skilled worker to make a flat-water race kayak in fiberglass, but 75 hours to build a Struer flat-water race kayak. For contact details, see Retail Outlets.
For more information, see:
• Dinghy Building, Richard Creagh-Osborne. 1976, Adlard Coles, out of print but available secondhand.
• Cold-molded & Strip-Planked Wood Boatbuilding, Ian Nicholson, 1983, Stanford Maritime. Mainly about yachts.
Buoyancy
In a very light boat for use on sheltered waters you may prefer to use polystyrene foam pillar buoyancy and inflatable air bags rather than fit bulkheads and hatches. See Additional Flotation For Your Kayak.
If you install bulkheads to create sealed buoyancy chambers, each chamber needs at least to have drain plugs in the deck and your kayak will be more useful if you install deck hatches.
Cockpit
There are many ways to make a cockpit coaming and most of them are in Björn Thomasson's nice online Building Manual at www.thomassondesign.com.
For a fast solution with a traditional look, take a chestnut pole slightly longer than the circumference of your cockpit. Unless it is freshly cut from the tree, soak it for a few days. Using an axe and wooden wedges, cleave out of it a long strip of wood 45 mm wide and 5 mm thick. Steam the strip if necessary to make it flexible, wrap it round a cylinder the size of the desired cockpit and rivet the ends together. Then screw it to the deck beams and glue it to the deck. Add a lip of rope or wood to make sure your sprayskirt stays on under stress.
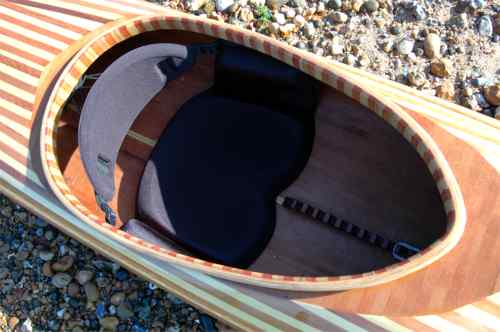
Alternatively you can glue narrow, flexible strips of wood to the deck, bending them so that they curve round the cockpit. On top of this foundation you glue further, slightly wider layers until you have a coaming of the required height and shape. Then use a plane and electric sander to make it smooth and shapely. There's a fine example of a stripwood cockpit coaming at the top of this page.
If cost is not much of an issue for you, you may prefer to cut up a half-sheet of plywood into a series of egg shapes of slightly different sizes, according to a designer's pattern, and glue them together, stacked one on top of the next.
Install simple knee grips so you can brace yourself inside the kayak when rolling.
Hatches
A wooden kayak will last longer if you leave the hatch covers off when ashore. Your editor prefers to buy hatch rims and covers from a kayak store and fix the rims to the deck with rivets or bolts. See Hatches. It is possible to make hatch rims the same way as you make a cockpit coaming, below, and to make a hatch cover the same way you might make a sprayskirt, but make sure it will stay on if a heavy wave drops onto your deck. See Hatch Covers.
Seat
In general, see Kayak Seat. Builders of traditional kayaks very often make a seat with a piece of PE foam sleeping pad, casually folded and rolled until it is comfortable. It is not easy to make a seat yourself which is both comfortable and looks professional, but it can be done. Alternatively you can buy a shaped foam seat like the example at the top of this page.
Furniture, hockey sticks, tool handles and wood kayaks all need to be kept at a reasonable humidity. Too moist and the wood will start to decay. Too hot and dry and it will weaken and split, so don't put wooden objects on top of a radiator or leave them in direct sun for too many summers. Technically, you want a moisture content between 3% and 19%.
You can keep moisture at an acceptable level with paint, varnish or oil. For the perfectly smooth, even coating you might see at a boat show you need an epoxy base layer and seven coats of linear polyurethane spray. Some feel that a wooden boat is a wooden boat, there's enough plastic in the world already, and a few irregularities, dents and stains give a nice patina. Like lichen on an old stone house or scuffs on a favorite pair of walking boots.
For the wood of a traditional skin-on-frame kayak or a Greenland-style paddle, a traditional finish is appropriate.
For example, raw linseed oil which is used to treat cricket bats. It penetrates deeply into the wood if applied on a warm day, gives effective protection for the wood and a good hand-grip on the shaft of a wooden paddle. It is easy to refresh with no need to use a scraper or sandpaper on the surface of the wood, but it takes three or four days to become dry to the touch and takes weeks to dry completely. Some prefer "boiled" linseed oil which has chemical driers, but it is more viscous and does not penetrate as deeply. A wood surface treated with linseed oil will get darker and darker over time.
Another possibility is a clear matt coating of Danish oil, which is tung oil with added dryers and a UV filter. It is very quick and easy to apply, easy to refresh after a few years, and does not darken.
For a strip-plank or plywood kayak, a glossy finish of clear varnish or paint may be more appropriate.
If you intend to store your wood kayak in a cool, dry, dark, well-ventilated place between outings, you can simply finish it with a good-quality clear sealant or paint intended for exterior woodwork on houses. Or you could spend the extra and finish it with polyurethane yacht varnish or a yacht paint. If you want the best, that would be a two-part polyurethane yacht varnish or paint.
Clear varnish usually needs a little work every year and total replacement after a few years. Where the varnish is chipped or worn and water can reach the wood inside, it will turn the wood black. Paint lasts longer than varnish but after five or fifteen years, depending on the amount of use and conditions of storage, you will have to strip it all off to bare wood and start again.
You could follow the example of yacht builders by painting all the bare wood with epoxy resin before you apply a surface coating of paint or varnish. The epoxy does not penetrate far into the wood but it does seal the surface so that the wood does not absorb much water. If the kayak is used at the weekend and stored indoors the rest of the time, with the hatch covers removed for ventilation, the epoxy coating will prevent it absorbing any water.
This is sometimes known as WEST system ("wood epoxy saturation technology"), a trademark of the Gougeon Brothers who sell their epoxy formulations worldwide. Interesting people - they also build wooden boats of all kinds and they like sailing canoes. Another big formulator of marine-grade epoxy resins is SP Gurit, formerly Structural Polymer Systems. Both of them have interesting websites. See Retail Outlets.
If you sheathe your kayak with thin glass cloth and clear epoxy, you will still see the beauty of the wood. However if left in sunlight the epoxy will become milky or yellow unless it is itself protected by a coat of polyurethane varnish with a UV filter. The ultimate is a two-part marine-grade polyurethane. Any varnish will eventually need replacing.
Epoxy coating is messy and expensive. People love what it can do to a boat, but most people dislike using it. It is truly unhealthy stuff. Because it is sticky and you are trying to do a delicate job with it, it tends to get on your skin. Some boatbuilders have had to find a new career after frequent exposure to epoxy has caused them to become sensitized to it. Epoxy is notorious for its ability to cause severe dermatitis if it gets onto the skin either as a liquid or in workshop dust. Some regular users find that epoxy is not the only thing they can no longer tolerate. Some have to avoid a range of common household chemicals, vehicle exhaust and barbecue smoke.
However if you build only one or two kayaks you should survive. Use barrier cream, gloves, overalls and a respirator when necessary, and have a proper wash afterwards. Use the correct size of brush to avoid spreading epoxy resin around. If you can apply the resin with a hypodermic syringe instead, that will reduce the amount of waste and contamination.
As with any boatbuilding resins, if you buy marine-grade epoxy in small packages from a yacht chandler you will pay a high price per pound. For other options, see Retail Outlets.
| Go to next page for: • Skin-on-frame kayaks • Skin-on-frame materials • Skin-on-frame & offshore safety |