River playboats are short and they move quite easily sideways through the water, if you know what to do with your paddle.
Sea kayaks are much longer and they don't like moving sideways. If you want to go a few yards sideways in a sea kayak, it's often faster to reverse five or ten yards and then paddle forwards to the new location. However a sea kayak can be dragged sideways through the water quite quickly with the correct paddle stroke.
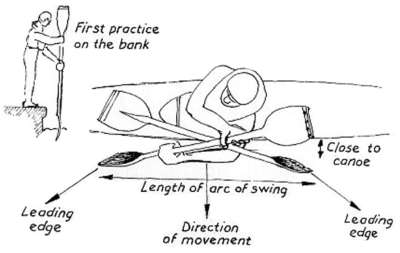
A beginner is likely to feel unstable when trying draw strokes for the first time, and may do better if rafted up with another kayaker.
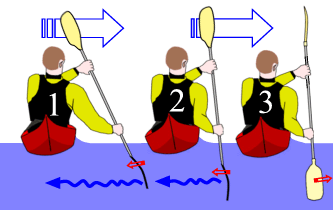
Draw stroke
This one is the basic draw stroke. Some people call it a T-draw.
Here are instructions for a draw stroke on the left.
We'll start with the "old school" technique, which still has a lot of followers including your editor, and then we'll look at the latest method.
1. Hold your paddle in the basic paddling position.
2. Bring your right arm up and across your face until your right elbow is in front of your nose and your paddle shaft is almost vertical. The left blade will be in the water doing the work, so we'll call it the active blade. At this point, keep the left blade just above the water.
3. Twist your control hand if necessary so that the power face of the left blade is towards the side of the kayak. Keep sitting comfortably upright, rotate your upper body to the left, and reach out to the side with your left blade as far as you comfortably can.
4. Plant the blade in the water about 2 feet from the side of the kayak. Look in the direction you want to go. Pull the active blade towards the kayak. Lift the active blade out of the water before it meets the side of your kayak (see important note below).
5. Repeat. Your kayak moves sideways through the water.
If you find that the front end moves sideways faster than the back, lean backwards a little so that the blade applies its power a little closer to the back of the kayak. If the back end is going faster than the front, lean forwards a little.
IMPROVEMENT 1: Try pushing outwards with your upper hand as you pull the lower hand towards you. It will keep your paddle more vertical, and give each stroke a little more power.
IMPROVEMENT 2: For best control, always make the paddle blade move through the water at a right-angle to the centre line of the kayak, rather than pulling the blade towards your body. |
 |
IMPORTANT NOTE: At the end of a draw stroke, you want to lift the active blade out of the water. You can't easily lift the blade unless you twist it so it's at 90 degrees to the side of your kayak.
If you don't twist the blade before your kayak hits it, this will happen: Your kayak will stop moving sideways the instant it hits the paddle, your body will continue to move sideways, your paddle will be knocked out of your hand, and you will do an instant capsize towards the paddle.
In other words, you'll trip over the active blade. |
 |
This is how to do it:
Just before the blade reaches the side of the kayak, twist the shaft so that the power face is pointing towards the back of the kayak.
Now you can lift the blade, and it will slice up through the water like a knife. |
 |
Draw strokes and edging
When a kayak goes sideways fast, water piles up on its leading edge. It makes a cushion of water which can even start to build up on the deck. This cushion may trip you so that you capsize. On fast moving water, it's often necessary to edge your kayak. This means lifting one knee to raise one edge of the kayak. You raise the edge above the cushion of water. See Breaking In, Breaking Out.
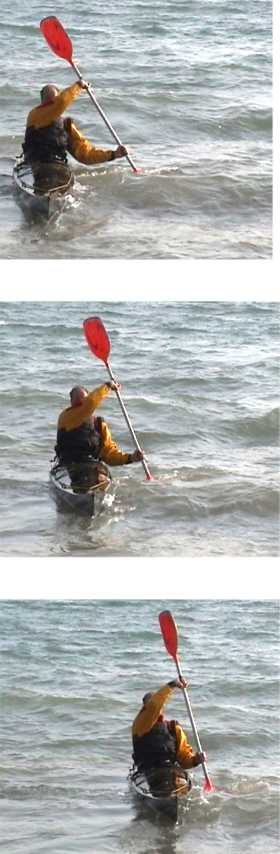
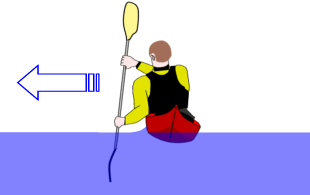
Most coaches today say that you should edge your kayak when you do a draw stroke. In the photos at the top of this page, the kayaker is doing a draw stroke and he's not edging. His kayak is sitting level on the water. He's moving right along, he's still the right way up and the world has not ended. However if you want kayaking qualifications, you will have to show the examiner that you can edge your kayak with confidence.
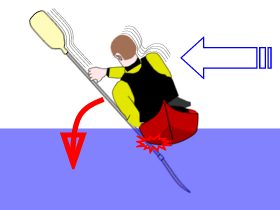
 The kayaker in this graphic is moving to the right, and he has raised his right knee to edge the kayak. A little water is piling up on the leading edge of the kayak, but most of this "cushion" is going underneath the kayak. The kayaker in this graphic is moving to the right, and he has raised his right knee to edge the kayak. A little water is piling up on the leading edge of the kayak, but most of this "cushion" is going underneath the kayak.
Some coaches say "raise the leading edge when you're doing draw strokes in a river kayak; raise the other edge when you're doing draw strokes in a sea kayak".
Confident paddlers often edge and lean towards the direction they want to go, so they can reach out much further sideways with the paddle. It's an unstable position, and if you overdo it a lot of water will pile up on your deck and slow you down, but it's fun to do when you're having a sideways race with your friends. |
"Old school" draw strokes or latest method?
"Hey, wait a moment - you just said the upper arm should be across the kayaker's face, like in the photos, but in the graphics it's below his chin!"
Well, most coaches today say that having your top arm in front of your face is "old school" and:
- your top arm should be lower, below the level of your chin. This means that you can see over your top arm. It also means that if you're on moving water and you run into a tree while doing this stroke, you're less likely to get tangled up.
- the active blade will then be deeper under water. Because the active blade is below the kayak, the lump of water you pull towards you with each draw stroke will pass underneath the kayak, not hit the side of the kayak.
It's useful to be able to do it both ways. The old school version is better for shallow water, and makes it easier to lift your active blade out of the water at the end of each draw stroke. With the new version, at the end of each draw stroke, after you twist the paddle blade, it may be easier not to lift it out of the water. Instead you can slice it through the water, away from the kayak, until it's in position ready for your next draw stroke. |
Hanging draw stroke
This is a draw stroke on the move. The kayak is moving forwards quite fast, and you want to move yourself and the kayak anything up to 3 feet sideways, but without changing direction.
The hanging draw stroke looks exactly like position 4 for the ordinary draw stroke, above. If you want to drag your kayak to the right, rotate your body to the right, and reach out to the right of the kayak holding the paddle as vertical as possible. Place the lower blade in the water about 2 feet from the side of the kayak and parallel to the kayak, so that it cuts through the water as you go along. Twist your wrists so that the leading edge of the blade in the water is angled slightly away from the kayak. Because you are moving fast, the angle of the blade will pull your kayak sideways. You don't need to pull the blade towards you as in the ordinary draw stroke, but you can if you like.
Probably you will need to lean your body forwards and reach forwards when doing this stroke, so that the blade in the water is about as far forward as your knees. If you don't do that, the stroke may send the front of your kayak the wrong way.
The hanging draw is quite easy and fun, but it's not an essential stroke except in one unusual situation. If you find that your kayak is moving fast, parallel to a vertical cliff and too close for you to get your paddle in the water on the side next to the cliff, a hanging draw stroke on the other side will get you out of trouble.
Sculling draw stroke
 |
Again, this is not an essential stroke but it is powerful, elegant and good practice. The effect is the same as the ordinary draw stroke, but the blade stays in the water the whole time.
Thank you to Alan Byde for permission to reproduce this illustration from his book Living Canoeing (A&C Black, 1969).
Rather than pulling the blade towards the kayak, you make it move forwards and backwards along an imaginary straight line parallel to the kayak. The leading edge of the paddle is always angled away from the kayak at about 45 degrees, and this pulls the kayak sideways towards the paddle. |
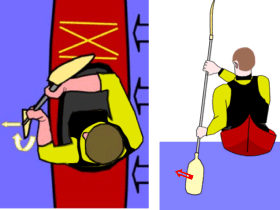
Instructions for a sculling draw stroke on the left:
1. Hold your paddle in the basic paddling position.
2. Keeping your left hand where it is, bring your right arm up and across your body until your paddle shaft is almost vertical and your right elbow is in front of your nose ("old school") or below the level of your chin (latest method).
3. If necessary, twist your wrists so that the power face of the left blade is towards the side of the kayak. Keep sitting comfortably upright, and rotate your upper body to the left. To put that another way, sit upright and twist your shoulders to the left.
 4. Reach out to the side with your left blade, and plant it in the water about a foot from the side of the kayak.
5. Twist the blade so that the front edge is angled away from the kayak, and move it forwards parallel to the kayak until it is level with your shins.
6. Twist it so that the rear edge is angled away from the kayak and move it backwards, twisting your upper body to the left until the blade is just behind you.
7. Repeat step 5.
8. Keep the paddle moving backwards and forwards on an imaginary straight line (not a figure 8 or an arc) parallel to the kayak. The kayak moves sideways.
IMPROVEMENT 1: Experiment with different blade angles and speeds.
IMPROVEMENT 2: As with the ordinary draw stroke, try edging the kayak as in the graphic. Keep your body upright, but lift your knee on the leading side of your kayak.
Go to next page for:
• Hip snap