If one member of a group goes for an accidental swim, his friends can get him back into his kayak and the group can continue.
If you have a portable pump and the casualty's kayak has a lot of positive flotation, you can just turn it the right way up, raft up with it, get the casualty straight back in and then pump out the kayak. This may mean a lot of pumping and it is usually a lot faster to empty the casualty's kayak before getting him back into it. If his kayak has bulkheads, just lifting up the front end will empty it of water. If not the rescuer probably needs to put the casualty's kayak across his own boat and teeter-totter the ends up and down.
If the casualty can normally climb out of a swimming pool without using a ladder or steps, he should have no trouble at all getting back into his kayak. If he does have trouble there are some easy techniques which will help.
Note that with even a gentle Force 2 or 3 wind, the rescuer's kayak will blow away faster than a casualty wearing a PFD can swim after it. In a Force 5 wind or stronger, it becomes difficult for anybody to carry out a deep-water rescue. See Beaufort Scale For Kayakers.
TX-rescue / T-rescue
These are quick solutions. With practice in a swimming pool and then at sea in calm conditions you should be able to get a casualty back in his kayak in less than two minutes.
TX-rescue
The traditional TX-rescue (sometimes called the X-rescue) is old school but you know it will work. It is useful if the casualty is inexperienced, cold and scared, or has a kayak which is heavy with equipment or a lot of water. It can scuff or even damage a fiberglass sea kayak, so if possible try it first with polyethylene playboats.
1. The casualty should keep hold of his kayak so it does not blow away faster than he can swim after it, keep hold of his paddle so he does not lose sight of it, and yell for help. A whistle is very useful in this situation.
2. The rescuer's first tasks, while heading towards the casualty, are to check that the rest of the group will be OK on their own for the next five minutes and assess whether it's safe to do a rescue. The location may be dangerous if large waves are breaking there, or may break there before you've finished. Or wind and tide may take you someplace undesirable in the next couple of minutes. See Rescue In the Surf Zone.
3. On reaching the casualty ensure that he, his kayak and paddle stay together. In cold water consider forming a raft with another kayaker and getting the casualty onto it before dealing with his kayak.
4. The rescuer gets a good grip on the front half of the casualty's kayak. If it's on your right, hold the bow loop with your left hand and place your right hand on the kayak to stabilize you. If the casualty is calm and fit, give him the paddles to hold. If not, you could attach them to a paddle park, slip them under your deck elastics or just lay them down across your lap.
 |
5. If the casualty is close to your cockpit, about three feet in front, you can reassure him with speech and eye contact. Consider telling the casualty to hold onto your deck rigging and pull himself round to the other side of your kayak, because if you need help he will be more use there. He can stabilize your kayak by putting both arms over the deck and holding on. |
 |
6. If the casualty's kayak has a lot of water inside you can start by turning it onto its side and lifting gently until most of the water flows out. Or you can ask the casualty to do this. See The Curl, below. Unless the casualty is able to assist with the rescue by pressing the stern down underwater, the rescuer will find that the casualty's kayak naturally wants to sit on its side at this point, so it takes some effort to get it upside down for tip-out. |
7. With the casualty's kayak upside down, raise the front end. This may be all it takes to empty it.
8. Otherwise you can do a full TX-rescue by hauling the casualty's kayak onto the front deck of your own boat. If it's still too heavy to get onto your kayak, consider giving up the TX method, getting the casualty back into his kayak and pumping the water out. It's very slow but it saves damage. If you choose to proceed with the TX method you can ask the casualty to help pull his kayak across yours. If he's on the opposite side of your kayak he can do this easily.
 9. Raise one end of the kayak and then the other to get the water out, and put it back in the water alongside your own. Get a really firm grip on the empty kayak so as to make a stable raft, and tell the casualty to climb back in.
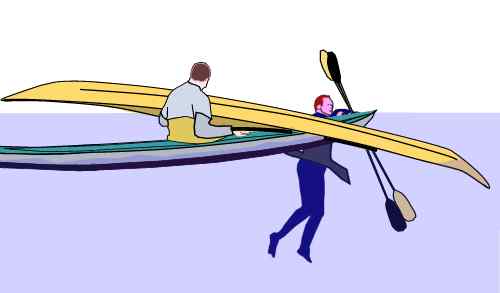
10. As long as the casualty is fit and well (s)he should have no difficulty at all scrambling back into the kayak while the rescuer holds them together in a raft. However some casualties do have trouble so it worth practicing an easy system.
One fast solution is for him to do a heel hook (illustrated). He moves round until he is alongside his kayak, just behind the cockpit. With his chest against the side of the kayak he reaches up and grasps the cockpit, swings one leg up, hooks the heel inside the cockpit and then wriggles up, slides forward and sits down.
If the casualty is in really bad shape, the rescuer can rig a rescue stirrup. This is a loop of rope or cord hanging down 24-28 inches into the water which acts as a step. The casualty puts his foot in the stirrup, stands up on it and collapses across the kayaks.
You can make a stirrup in advance and carry it with you, or use your tow-line.
Our preferred method requires a loop made of only 8 feet of cord but the rescuer must have a sturdy deck fitting beside his or her cockpit. Attach one end of the loop to the deck fitting using a lark's foot knot and pass the other end over the casualty's kayak so it dangles down in the water.
 Another method of rigging a stirrup requires a loop made of 13 to 15 feet of cord. Put one end of a paddle through the loop and slide the loop down to the middle; place the paddle across the rear deck of the casualty's kayak so that the loop dangles down between the kayaks, bring the other end of the loop up the other side of the casualty's kayak and wrap it round the paddle shaft a few times until you have the right amount dangling into the water.
If the casualty is injured and cannot do much to get back into his kayak, you can hold his kayak on its edge while he or another member of the group slides his legs into it, and then the kayak can be rolled upright, scooping him up as in the side rescue.
There are lots of other ways to get back into a kayak. Another method, old school but still quite widely used, is to get the casualty between the two kayaks, towards the rear of his own kayak. The casualty floats on his back, puts one arm on top of each kayak, gets his feet up into the back of his cockpit, wriggles up and slides forward. A variant on this, which is used to prevent the kayak re-filling when the casualty's weight presses it down and tilts it over, is to place the paddles so that they make a bridge just behind the cockpit. The casualty then hooks his heels over the top of the paddles, straightens his arms and legs to lift his body out of the water and slides forward into the cockpit.
If the casualty's kayak has low volume, his weight on the rear deck may press it down so far that water starts to flood into his cockpit. See Skin-On-Frame Kayaks & Offshore Safety.
11. Before you let go, is the casualty OK to proceed? He probably capsized because the conditions were a bit too much for him, and his morale and co-ordination won't be any better for having spent five minutes in the water. Real casualties very often capsize again within thirty seconds. Does he need to be towed to safety with a kayak rafted up alongside him for support?
T-rescue or bow tip-out
This is a fast, elegant rescue which works very well if the casualty is experienced and has an unladen kayak with a bulkhead just behind the seat.
a) The casualty yells for help and keeps a good grip on both his kayak and paddle. He may clip his paddle to a paddle park. As the rescuer approaches, the casualty moves to the back of his kayak and gets ready to press it downwards.
b) The rescuer takes hold of the front end of the casualty's kayak and lifts up as the casualty presses the back end down underwater. If you are the rescuer and the casualty's kayak is on your right, hold the bow loop with your left hand and place your right hand on the kayak to stabilize you. Lift the front of the kayak until you can support it on the crook of your right arm. If the casualty is pressing down and the kayak is unladen, this is fairly easy. If necessary, drag the casualty's kayak part-way across your kayak. The water rushes out of the cockpit and you flip the kayak the right way up again before putting it back in the water.
c) Then bring the empty kayak alongside your own and take a firm grip on it so as to make a stable raft.
d) The casualty pulls himself along his kayak's perimeter lines until he is just behind the cockpit. He gets his arms onto the rear deck of his cockpit, surges up out of the water and climbs back in. If he finds that difficult he can swing up one leg, hook the heel inside the cockpit and then wriggle up, slide forward and sit down.
 If there are two rescue kayaks, they can raft up side by side. One of the rescuers deals with the casualty's kayak and the other one holds the raft together.
  The casualty does most of the work, using the rescuer's kayak as a float.
  The old fashioned H-rescue remains a possibility worth considering if the rescuers have plenty of muscle.