Paddling your sea kayak (1)
Starting out, carrying your kayak, getting in and out
Starting out
Anyone learning to kayak is likely to have more fun if they first develop water confidence in a swimming pool. A reasonable standard would be the ability to swim 50 yards in light clothing, and to duck underneath an empty floating kayak and come up the other side.
If you just want to go short distances on hot days, maybe a sit-on top is the right kayak for you. Otherwise we recommend using a classic sea kayak, in which case you must learn to roll. It's quite easy as long as you have a good instructor. Two 2-hour sessions should be all it takes. Learn in a swimming pool but practice in the sea every time you go out. See Rolling Your Kayak.
A total beginner can step into a kayak and go for a trip straight away, in sheltered waters and with an experienced guide. In a two-day intensive course, a beginner could acquire solid techniques for maneuvering, staying upright and rolling. And in a two-week intensive course, a beginner could learn all there is to know about practical sea kayaking.
Most people prefer to learn step by step with a local kayak club. Kayaking's a popular sport, and most areas have a club where volunteers with coaching qualifications run low-cost courses leading to skills qualifications. The club will have have instructors to take you out under supervision on sheltered waters. An experienced instructor will be watching for common problems - "you can adjust your PFD with those buckles on the side, it wants to be a bit tighter.... is that wristwatch waterproof? ... Maybe experience getting out of your kayak upside down before you put on a sprayskirt ... OK, now we're using a sprayskirt, it's essential to have the release strap on the outside, where you can get at it ... today we won't go any further than the rocks over there, because there's quite a strong offshore wind ... don't worry if you can't go in a straight line at first, that happens to everybody who learns in a short kayak ..." That kind of thing.
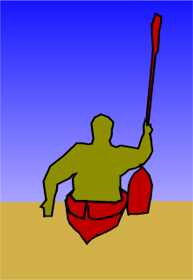
The "safety box"
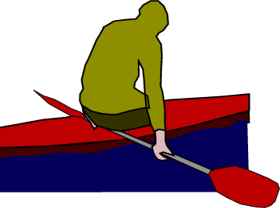
Reaching out too far with your paddle (forwards, backwards, above your head or down into the water or out to the side) will break up the smooth rhythm of your kayaking and put you in an awkward position for the next stroke. There are times when your instructor will encourage you to reach out as far as you can - but not out to the side. Reaching out sideways, as in the next two pictures, can give shoulder problems in some circumstances or to some people.
Over-extending isn't going to give you an injury if you do it while carrying out a draw stroke, any more than you are going to injure yourself doing a tennis serve or getting a pair of shoes out of a closet. It can sometimes be hazardous if you do it while your shoulder is heavily loaded or shock-loaded. This may happen if you reach too far out to the side in a high recovery support stroke or a high brace. Here's your editor demonstrating how not to do it, reaching a little too far out to the side:
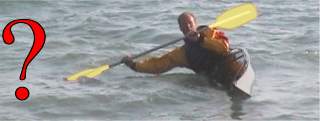
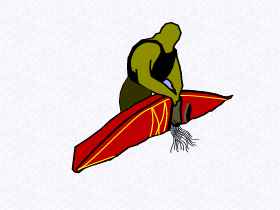
And here's Kayarchy's crash test dummy demonstrating something worse, which is letting your hand get above your head during a high recovery support stroke:
Of course, thousands of people have done both these things for years without problems, but there is a significant risk of a dislocated shoulder if you are one of those who have a vulnerable shoulder or your paddle hits a rock lurking under the surface. There is a real chance you will pop your shoulder if you let your hands get above your head while doing a high brace in big surf or if you drop your kayak into a big hole and it turns sideways. So, keep your elbows slightly bent, rather than straight. This can be described in terms of a safety box with the kayaker at its center.
Adjust the kayak to fit you
It's good to have a seat that fits. Your seat should be wide enough for your hips and no wider. If your seat is too wide, so that your bottom can move sideways, it will be difficult to roll your kayak. Fit some seat padding.
It's good to have knee braces so can edge your kayak confidently, a footrest adjusted so your feet press on it lightly, and a back-rest that provides some support. These things give you a better feel for what your boat and the water are doing. They will also keep you in your kayak when you do a recovery stroke or a roll, and when you're upside down in surf.
 First and foremost, your kayak needs to be comfortable. You don't want to be wedged in it all day so that you climb out with bruised hips. If it's correctly adjusted for you, you can instantly wedge yourself in it by pressing your feet hard against the footrest. That pushes you back against the backrest, and braces your knees under the deck of the kayak. You're solid. You wouldn't fall out if two gorillas picked your kayak up by the ends, turned it upside down and started bouncing you up and down. Useful for rolling and surf.
But don't let the lack of all or any of these things stop you going afloat. If you're using a kayak belonging to your club or a friend, you'll often have to do without. Traditional Inuit kayaks have a serious knee brace (the masik) but seldom anything we would recognize as a footrest or backrest, and their seat might be anything from a piece of wood to a roll of polar bear skin. In a modern kayak, it's sometimes a good idea to remove a kayak seat temporarily, so as to lower the paddler's centre of gravity. Lack of a footrest is not going to kill you or even be very uncomfortable if you're paddling on flat water. Older kayaks often don't have a facility for fitting a backrest, and (personal opinion) a backrest is really not important unless you slam into a cliff while surfing backwards.
More information
The best way to learn kayaking is with a club that runs a training scheme and has qualified instructors. If that's not possible, you can find what you need in Kayarchy, and you'll also find a helpful and fun animated kayaking course at www.kayakpaddling.net.
Kayarchy's approach is "keep it simple". When you get on the water and use a kayak and paddle, your body will do most of the analysis for you. Some people prefer a conscious analysis of every aspect of technique, and you will certainly need that if you want advanced kayaking qualifications. You can find it in two books published by Pesda Press in 2006. For forward paddling there's the BCU Coaching Handbook. For other strokes there's Sea Kayak by Gordon Brown. He breaks down each stroke into multiple phases and encourages you to be aware of what you are doing not just with your paddle but with your wrists, elbows, shoulders, head, spine, hips, buttocks, feet and knees. He also looks at warm-ups, stretching, mental preparation and many other useful things. For a really detailed analysis of edging and rolling technique there is The Bombproof Roll & Beyond by Paul Dutky (Menasha Ridge Press 1993, or revised 2nd edition 2005).
Carrying your kayak
 |
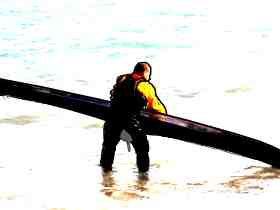
A sea kayak is a heavy, awkward load for manual handling, and it's no coincidence that a lot of sea kayakers have back problems.
Health & safety advice would be not to carry one on your own. Two kayakers can easily carry a pair of unladen kayaks safely. |
In fact we carry kayaks solo all the time, but there is a significant risk of injury if you bend forward to pick a 55 lb kayak up off the ground unaided.
Key safety points:
• Bend your knees, so you keep your back straight and upright.
• Stand as close to the kayak as possible. Never tackle a heavy weight at ground level if it's some distance away from your feet.
Also:
• If you want to turn round while holding a heavy load, move your feet. Don't leave your feet where they are and twist at the waist.
• Watch where you step. Slipping or stumbling while carrying a heavy load is a major cause of back injuries.
• If you're doing a solo carry of kayak and paddle, pick up the kayak first. Try to leave the paddle someplace you can then grab it without bending. If that's not possible and it's lying on the ground just pick up your kayak, straighten up, slide one foot under the middle of the paddle shaft, flip it into the air and catch it.
• If you are carrying a pair of kayaks with somebody else remember that the person at the back can't easily see what (s)he's walking on. Don't rush, especially over slippery rocks. If there's a step ahead or you are going to do something unexpected, let them know.
• Don't use an unnecessarily large or heavy kayak.
• Try to avoid carrying it when it has any sea water in it. Consider carrying food, drink and safety equipment up and down the beach separately.
• A flooded kayak probably weighs more than you do. If you have to empty it out, on land or on the water, roll it onto its side and let most of the water pour out before you try to lift it.
• if you have to carry an expedition kayak crammed with equipment, food and water until it weighs 330 lbs, try to get four people to help you.
For more information see Ergonomics Guideline for Manual Materials Handling which is a free download from NIOSH. Last time we looked the link was here
Getting into your kayak
Seal launch
 |
If you are launching from a smooth, soft beach or a wooden ramp you can launch like a seal.
Get into your kayak on the beach, with the front end pointing out to sea, and put your sprayskirt on. Put your paddle down on the cockpit, so that it is resting against your stomach where you can easily pick it up with both hands.
Lean forward and use your knuckles on the beach to slide the kayak into the water. If you have a strong paddle you can use that instead of one set of knuckles.
Easy. If there are waves coming in, keep your kayak pointing directly into them or they will turn you sideways and wash you back up the beach. |
Launching in other situations
If you have to launch from rocks or concrete, you will probably put your kayak on the water so it is afloat or only lightly aground when you get into it. You may be able to step straight into it (with one hand on the back of the cockpit, one hand supporting your weight on the ground, and your weight always on the centerline) and sit down. If not, you can use your paddle as a stabilizer, as shown below.
Some say it's unkind to use a paddle this way, but this is very mild compared to a lot of things that can happen to a sea kayaker's paddle. If you've got the sort of paddle that needs to be kept in a nitrogen atmosphere under a glass case, don't use it as a stabilizer.
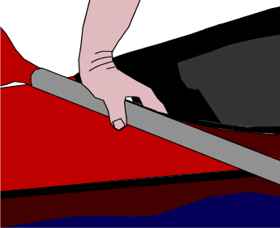 |
Say you are standing on a dock with your kayak in the water on your left, facing forwards.
Put your paddle down so that it is at a right-angle to the boat, with one blade resting on the land and the other end of the shaft resting on the kayak just behind the cockpit. Crouch down, reach behind you with your left hand, and take hold of the cockpit coaming and the paddle shaft. In other words, have your fingers inside the cockpit and your thumb holding the paddle shaft.
Step into the middle of the kayak with your left foot but don't put any weight on it yet. |
Now you can crouch down further, transfer most of your weight to your left hand and left foot and reach behind you with your right hand to grasp the middle of the paddle shaft. Put your right foot into the kayak, slide your legs in and sit down.
When you put the sprayskirt on, make sure the release strap is not trapped inside the boat. You need that strap to get out of the kayak. |
|
Capsizing, wet exit, emptying your kayak
Getting out of your kayak while it is upside down is known as a wet exit.
Your first wet exit
It is easy, but we're going to assume that you have never done it and that you feel slightly anxious about it. Try it soon and then you can relax. A good place would be a swimming pool or waist-deep water near the shore, ideally with a friend standing by to give moral support. The first time, try it without wearing a sprayskirt.
Sit in your kayak, take a deep breath and roll it over. Put your hands on the kayak by your hips and just slip out of it as if you were taking off a pair of pants.
(You may have been told to put your hands on the back of the cockpit and roll out forwards. This was the official method for many years, but human knees articulate in the other direction. A forwards roll worked fine in a swimming pool, especially if the instructor pretended not to notice that 9 students out of 10 just slipped out of the cockpit backwards. It didn't really work in shallow water or if the kayaker was wearing a PFD. The BCU now says"push the boat away from your legs with your hands. This is not a forward roll".)
Emptying your kayak
Your kayak is now floating upside down with very little water inside it. Just to see what happens, try to get your body on top of it. Notice the way air belches out of the cockpit and water rushes in. Something to remember later on, when you get involved in deep-water rescues.
 |
Then take your kayak to shallow water and empty it out. If it has a lot of water inside it, don't try to lift it at once. Roll it onto its side and lift slowly while most of the water flows out of the cockpit. Then put it back upside down, and lift one end to get more water out.
To get the last few pints of water out, if there are two of you, stand one at each end and take it in turns to raise an end while the other person lowers the other end. |
If there's nobody available to help, you can do this on your own. Use proper lifting technique as previously discussed.
To avoid scratching the deck it is best to do it in shallow water. Stand by the cockpit, keep your back straight and bend your knees to create a shelf. Lift one edge of the kayak onto the shelf and straighten up. Keep one knee bent so that the kayak is upside down with the cockpit resting on one of your thighs. Then raise each end in turn. |
 |
More practice
If you're a total beginner, we suggest you get back in and try capsizing again, still without a sprayskirt. This time, when you are upside down, reach up and tap your hands three times on the bottom of the kayak before you come out. So you know you are calm and in control.
Try a wet exit in deeper water, wearing a sprayskirt and holding your paddle. If you have never taken a sprayskirt off, it is worth experimenting the right way up first. Pull the release strap firmly - don't yank it hard in case it comes off in your hand. It is usually best to pull the release strap sideways rather than straight back towards you. When you're ready, capsize, take off the sprayskirt and make your exit.
Now things are getting real, bear in mind that at sea it is very easy to lose sight of a paddle, and in even a light wind your empty kayak will blow away faster than you can swim after it. Make it part of your wet exit drill to keep constant contact with your paddle by holding it with one hand, and with your kayak by leaving one foot inside the cockpit until you have hold of your perimeter line.
Keeping one hand on your perimeter line, go to one end of your kayak. Then you can use your legs and one hand to swim the kayak to shallow water.
Where to leave your kayak
Anyplace you like, but we suggest carrying it further up the beach than you first think is necessary before leaving it unattended for any length of time. On a gently-sloping beach when the tide is rising, a 12-inch increase in the water level may take the edge of the water 300 feet further up the beach. The rising tide may reach a point considerably higher than the band of seaweed it deposited on the beach this morning.
The water level may continue to rise well after the time of local high tide, because of factors including low atmospheric pressure, the arrival of a swell generated yesterday by a storm in mid-ocean, or a ship raising a five foot high wake near the coast.
If you have to leave your kayak unattended for a while and you're concerned about theft, it's easy to conceal a long, slim sea kayak by sliding it end-on into undergrowth. Five seconds and it's invisible.